You picked up a massage gun, ran it over your quads for three minutes, and woke up just as sore the next morning. Sound familiar? The tool is not the problem. Most people use a massage gun the same way they use a foam roller: push hard, sit there, hope for the best. That is not how percussion therapy works, and it is why a lot of people decide the whole category is overhyped. A massage gun used correctly can genuinely speed muscle recovery, reduce delayed-onset soreness, and get you back to training faster. Used wrong, you are just vibrating your skin. This guide walks through the exact protocol I use, attachment by attachment, muscle group by muscle group, so you stop guessing and start actually recovering.
Before we get into steps, one thing worth knowing: this is not medical advice, and percussion massage is not a substitute for addressing an actual injury. If something is acutely painful or swollen, see a professional. This protocol is for normal post-training soreness, tight muscle bellies, and pre-workout priming, which covers about 95 percent of the situations most regular gym-goers face.
Sore muscles need the right tool first. Here's the one I use.
The BOB AND BRAD C2 is the massage gun I've relied on for over four months of daily post-workout use. It runs quiet enough to use while watching film, has enough amplitude to actually move tissue, and costs a fraction of the big-name competitors. If you're following this protocol, this is what I'd recommend having in your hand.
Amazon Check Today's Price on Amazon →Step 1: Pick the Right Attachment for the Job
Most massage guns ship with four or five attachments, and most people just leave the round ball head on all the time. That works for large muscle groups like quads and hamstrings, but it is a compromise everywhere else. Here is how to match attachment to muscle group so you are not guessing every session.
The round ball head is your default. Use it on quads, hamstrings, calves, glutes, and upper back. It distributes impact across a wider surface, which feels better on fleshy areas and reduces the chance of accidentally hammering a nerve or bone. The flat head is for denser muscle groups where you want more surface contact, like lats and the chest. The fork head (the two-pronged one) is purpose-built for running alongside the spine on the erectors, or along the Achilles above the heel, without hitting the vertebrae or bone directly. The bullet or cone head is for specific knot work, small muscles like the tibialis anterior on your shin, or the arch of the foot. Use it carefully and briefly. On the BOB AND BRAD C2, all four attachments lock in firmly and stay put even at the highest speed setting, which matters when you are reaching behind your own shoulder.
One rule that applies to every attachment: stay off joints, bony prominences, and any area with visible bruising, swelling, or open skin. The massage gun is moving tissue, not warming a surface. Running it over a knee cap or elbow does nothing useful and can irritate the bursa underneath.
Step 2: Set the Right Speed for What You're Trying to Do
Speed selection is where most people go wrong in the opposite direction: they start on the highest setting because it feels more intense and therefore seems like it should do more. It does not. Higher amplitude at maximum RPM can cause involuntary muscle guarding, which means the muscle tightens against the stimulus rather than releasing. That is counterproductive for recovery work.
As a general rule: low speed (1-2) for warm-up activation before training, medium speed (2-3) for post-workout recovery and general soreness, and high speed (4-5) only for working into a genuinely dense, knotted area that is not responding to lower speeds. On the C2's five-speed range, I spend the majority of my recovery sessions on speed 2 or 3. Speed 4 gets used maybe once a week on my upper traps, which take a beating during heavy pressing. Speed 5 rarely comes out unless I have a glute knot that has been building for a few days.

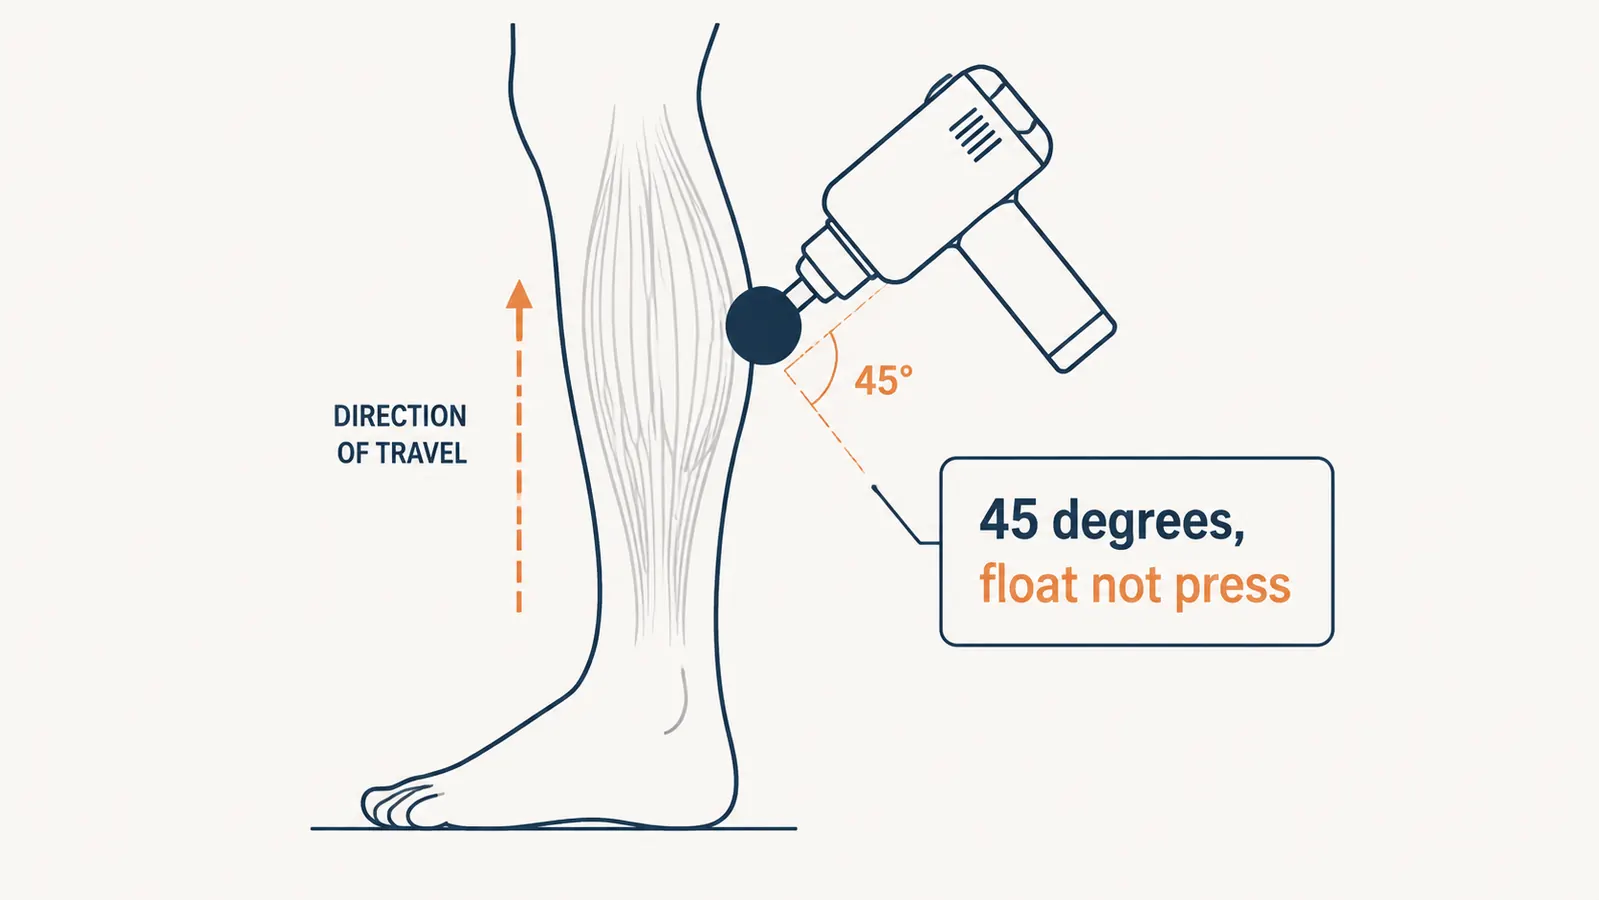
Step 3: Float the Gun, Don't Press It
This is the single most important technique adjustment most people need to make. A percussion massage gun works by delivering rapid, short-depth strokes into the muscle tissue. The amplitude does the work. If you lean your bodyweight into the gun, you are shortening that amplitude and reducing the effective impact on the tissue below the surface. You are also exhausting your arm and irritating the skin without any meaningful benefit to the muscle.
The correct technique is to hold the gun at roughly a 45-degree angle to the muscle and let the head float against the surface. Think of it like a printer head moving across paper: the machine does the work, your job is just to guide it slowly along the muscle belly. Move at about an inch per second. Let the percussion do the penetrating. You will feel the difference immediately: at medium speed with light contact, you will get a deep buzzing sensation that feels like it is going into the muscle rather than just rattling the surface. That is what you are looking for.
Float the gun at 45 degrees and move at one inch per second. That single change is worth more than adding speed or pressure.
Step 4: Work Each Muscle Group for 60 to 90 Seconds, Not Five Minutes
Duration is another common mistake. More time does not mean more benefit once the muscle tissue has had adequate stimulation. Most research and physical therapy guidelines land on 60 to 90 seconds per muscle group as the effective window for post-exercise percussion work. Beyond that, you start getting diminishing returns and, with aggressive pressure, potential tissue irritation.
A full-body recovery session using this protocol takes about 12 to 15 minutes if you stay disciplined about time. That is a realistic time budget for most training schedules. Here is a practical sequence: start with your two largest muscle groups (usually quads and hamstrings if you trained legs, or lats and traps if you trained upper body), then hit secondary groups, and finish with any specific trouble spots using the bullet attachment. Legs day recovery order: quads (90 sec per leg), hamstrings (90 sec per leg), calves (60 sec per leg), glutes (90 sec), hip flexors using light ball-head contact (60 sec per side). Upper body order: lats (90 sec per side), traps and upper back (90 sec), chest (60 sec), forearms if relevant (45 sec per arm). For a deeper look at why percussion therapy works on muscle tissue, the 10 reasons percussion massage guns speed recovery breakdown covers the physiology behind each of these benefits.
Step 5: Time Your Sessions for Maximum Benefit
When you use the massage gun matters as much as how you use it. There are three windows that each serve a different purpose, and using the gun in the wrong window can actually work against you.
Pre-workout (before training): Use low speed, 30 to 45 seconds per muscle group. The goal here is activation and increased blood flow, not deep tissue work. Think of it as a fast-forward warm-up. Keep the pressure light and the session under five minutes total. Do not use the gun on cold muscles at high speed before a session, especially before heavy compound lifts. Post-workout (within 30 minutes of finishing): This is the primary recovery window. Medium speed, 60 to 90 seconds per group as outlined above. Blood is still moving, the muscle is pliable, and you can reduce inflammatory buildup before it fully sets in. Next-day DOMS treatment (24 to 48 hours after training): This is where the gun earns its keep for most people. Delayed-onset soreness peaks around 24 to 48 hours post-training. A 10-to-15-minute session at medium speed the morning after a hard workout can noticeably reduce how long that soreness lasts and how restricted your movement feels. This is the window I use most consistently.
What Else Helps Recovery Alongside the Massage Gun
The massage gun is one tool in a recovery stack, not the whole stack. The three factors that drive the most recovery outside of the gun itself are sleep, hydration, and protein intake in the post-workout window. Percussion massage increases local blood flow and helps clear metabolic waste products, but if you are under-sleeping and under-eating protein, you are working against your own biology. For soft tissue work that the massage gun cannot reach as effectively, a foam roller handles the IT band, thoracic spine, and tensor fascia latae better than any handheld percussion tool. The two tools are complementary, not competing.
If you have a specific muscle group that stays chronically tight despite consistent massage gun work, that is usually a signal of a mobility or movement-pattern issue rather than a recovery-tool problem. Adding hip flexor stretches, improving ankle dorsiflexion, or addressing thoracic rotation deficits will do more for chronic tightness than any amount of additional percussion work. The gun relieves symptoms. Addressing root causes removes them.
Ready to run this protocol? Here's the massage gun that holds up to daily use.
The BOB AND BRAD C2 has been my go-to for post-workout and next-day recovery sessions for four months without a single issue. Quiet motor, solid amplitude, five speeds, and all the attachments you need for this full-body protocol. It's FSA/HSA eligible, which makes the price even easier to stomach. Check the current price on Amazon before you buy elsewhere.
Amazon Check Today's Price on Amazon →